Blog Post #30

Getting Organised

As photographers we all want to be out taking photographs and not tied to computers or filing systems. It’s often seen as a non-productive activity or admin., but it is fundamental to being able to organise and to access our work. We are all familiar with our parents and grand parents method of organising photos. If they are anything like mine it was chaotic with everything piled in shoe boxes and the negatives would be ditched as what use were they now they had their prints? When we entered the digital world things changed. We now had JPG files that we could not see, hold or touch unless we had a device that was capable of displaying them. We would keep these JPG files in folders on the same device but we still had nothing physical to “file away” in our shoe box. Unfortunately some people carried over this slap dash way of organising their pictures into the digital age, the result being that they cant find anything, have multiple folders and catalogues spread across multiple drives and many duplicates of the same images gobbling up precious memory. This causes issues for post-processing software whereby it cant find file locations either to access or store the images. You therefore need a system.

My Engineering background tends to mean that I am an organised person, cognisant of the need for a standard and repeatable way of doing things. When considering what my system had to look like, firstly a few things were taken into consideration. I would need some way of storing the images with back ups in order to protect them. and it must allow easy accessibility to each photo. I have found out through experience that when designing systems its best to sketch it out on paper and model it first to make sure it achieves the desired outcome.

If I show you my file structure it may explain it better. I have a folder called Picture Library in Finder on my Mac (File Explorer on Win). The left hand column shows the top level 11 folders I designed on paper before constructing the file tree. The second column shows the sub-folders I think I will need for the various Archive Scans. The third column or Negative Scans folder contains the events or assignments by name and date. Each of these events contains all of the shots I took on the day. As these files are all digital scans from negatives in this example they are all JPG files. If they were camera shot files they would be in the Raw format. The final folder, Finished JPGs, are the post processed images exported in their final form as a JPG.

This simple structure has stood me in good stead for many years with very few tweaks. I discipline myself not to add to it unless absolutely necessary.

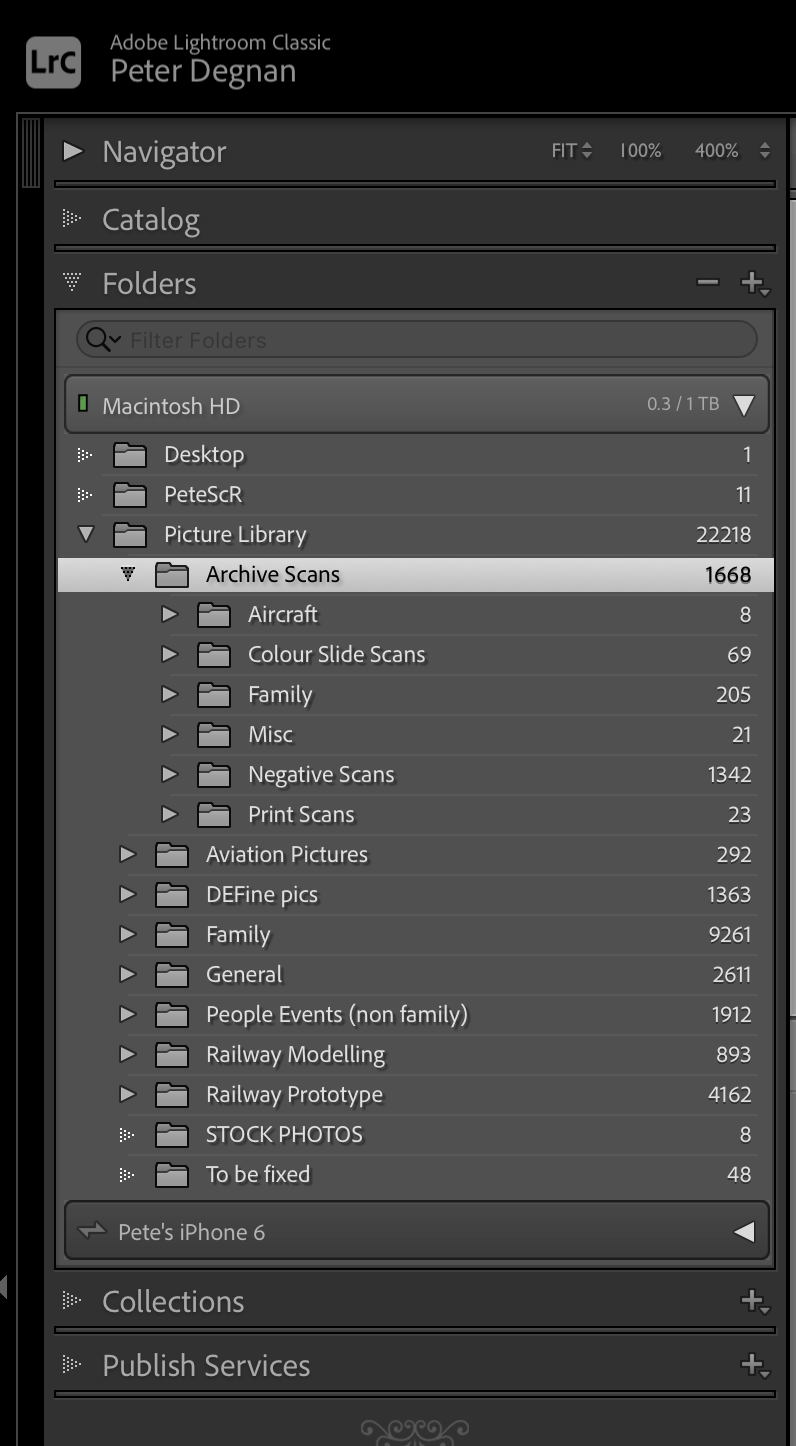
The benefit of having a robust system is that it is easily imported and synchronised with Adobe Lightroom. I can therefore see this structure mirrored in my post processing software and means I know exactly where everything is. The image on the left shows my structure as constructed in Finder and imported and synchronised with Lightroom. If I change something in my Finder folders or in my Lightroom activity, I can hit synchronise and both Finder and Lightroom catalogues are in step.

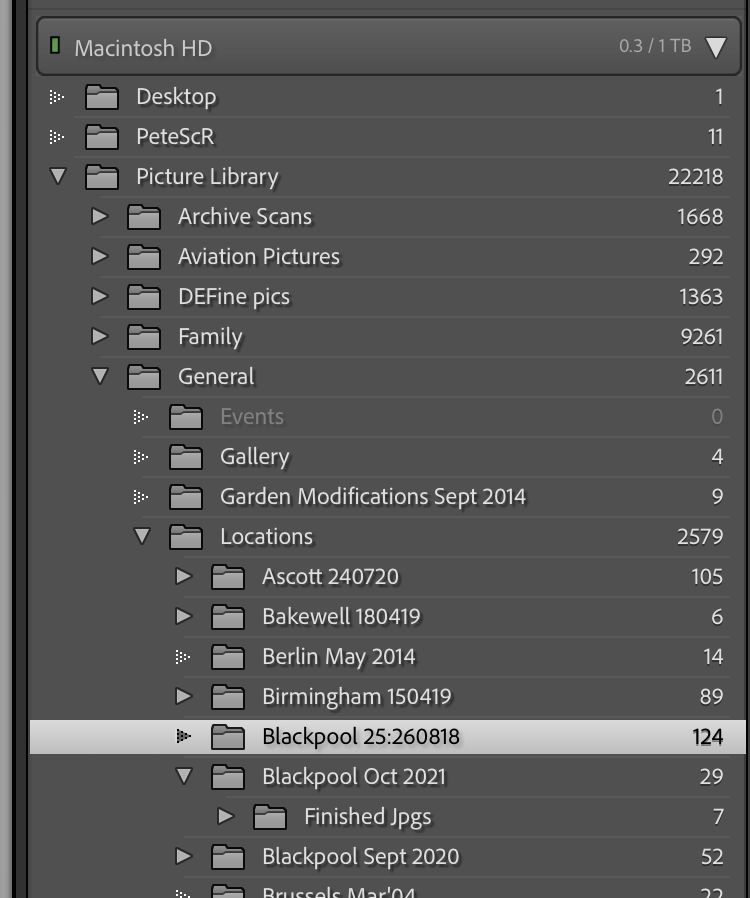
The above image is just another example of my catalogue structure showing the General folder and its contents. This enables me to locate and work on any photo I have without having to search for it. I have purposely maintained one Lightroom Catalogue since day one and have it located on my Mac hard drive. This simplifies things as Lightroom has difficulty finding images that are located on external drives if they are not connected.


It is worth pointing out at this point that in order to ensure your drive is not storing duff shots, failures and copies, you need to do a “cull” on your work either whist importing from the SD card or immediately after. If you are shooting in Raw this is doubly important as these files can be large an unnecessarily gobble up valuable space. By “culling” I don’t mean delete boring shots as I have found that todays boring shots can be very interesting historical records in the future. I mean the technically poor images and duplicates of the same image. I also make sure that when I am exporting a JPG file from a Raw image worked on in Lightroom, to a “Finished JPG” folder, I don’t restrict it in size and go for best quality. That way I have a good Raw and finished JPG version of the image in question.

So now that we are all organised and know where everything is, how do we make sure we never loose them? What is our back up strategy? For me it is quite simple. My Mac has plenty of memory so all my prime downloads are on my Mac within my Picture Library folder as shown above. I back up my Mac using its “Time Machine” facility every hour to an external drive. I then have a second external Drive that backs up the folder I have my Picture Library and all of its contents in, this is also done every hour. Finally I have an off-site back-up of my complete Mac which is automatically carried out every day using Backblaze. For around £6 per month Backblaze gives me the piece of mind that if my Mac and hard drives ever get stolen in a burglary, consumed by fire or water and who knows zapped by a lightning strike, I still have everything protected on the Backblaze server.

So that’s how I get organised. Another step I am taking, which I should have done years ago is to keyword my images. This can be labourious if done in retrospect so I am now doing it with every new import of files. I am still working may way through my back catalogue of images but Lightroom makes it easy using the spray-can method and key-wording multiple images at one time. I have kept mine simple for now with Year, Location and Genre being the tags I use.

I hope you have enjoyed this blog post and thank you for reading it. If you want to comment on this blog post please do so below or you can contact me by using the “Contact Me” facility in the website header.

Previous
Previous

Blog Post #31

Next
Next

Blog Post #29